

How to save chat in Zoom meeting (Saving in-meeting chat – Updated)
The Zoom desktop client offers a powerful and versatile solution for archiving in-meeting conversations, allowing users to effortlessly save chat logs to their local computer or the Zoom Cloud. This feature provides unparalleled flexibility in chat management, catering to diverse user preferences and needs.
Archiving Options:
- Direct messages sent to you
- Messages broadcasted to the entire meeting or webinar audience
- Messages sent to all participants
- Chats exchanged during cloud recording sessions
Saving Methods:
- Manual Saving: Allows users to selectively archive conversations
- Automatic Saving: Offers a hands-free approach to chat preservation
The Zoom desktop client simplifies the process of securing valuable conversation threads, providing a seamless experience for users seeking to maintain comprehensive records of their virtual interactions. This robust feature accommodates various preferences:
- Manual local saving for personalized access and control
- Automated options for efficiency and convenience
The Zoom Cloud feature proves particularly beneficial for users who frequently leverage cloud recording. It ensures a focused archive of chats relevant to the entire audience, streamlining the process of reviewing and referencing important discussions.
By exploring the extensive capabilities of the Zoom desktop client, users can significantly enhance their virtual meeting experiences. Whether you’re a business professional looking to maintain accurate records, an educator preserving student interactions, or simply someone who values thorough communication archives, Zoom’s chat saving features offer a solution tailored to your needs.
Embrace the power of efficient chat archiving with Zoom, and transform the way you manage and reference your virtual conversations. With these tools at your disposal, you’ll never miss a crucial piece of information shared during your online meetings again.
Contents
- 1 How to save Zoom in-meeting chat manually.
- 2 How to Automatically save chat in Zoom Meeting
- 3 How to save in-meeting chat to the Zoom cloud
- 4 How to access your saved in-meeting chats on the cloud
- 5 How to access your saved in-meeting chat in the computer’s default save location
- 5.1 How to View the local recording path saved in-meeting chat
- 5.2 How to Change the default save location of Zoom Local Chat Recording
- 5.3 Frequently Asked Questions
- 5.4 Where are saved chats in Zoom?
- 5.5
- 5.6 Can I see Zoom chat after meeting?
- 5.7 How do you copy text from Zoom chat?
- 5.8 How long are Zoom chats stored?
- 5.9 What happens to Zoom chat after meeting ends?
- 5.10 Related Articles-
In-meeting chat saving requirements
- Utilize the Zoom desktop client on Windows, macOS, or Linux, ensuring a global minimum version or higher for optimal performance.
- Cloud recording is a feature exclusive to licensed users, offering advanced functionality and enhanced virtual meeting experiences.
- License holders with cloud recording enabled can conveniently save in-meeting chats directly to the Zoom Cloud.
- Ensure you are using the latest version of the Zoom desktop client to access advanced features and seamlessly manage your virtual collaborations.
- Upgrade your virtual collaboration experience by leveraging cloud recording capabilities, specifically designed for licensed Zoom users.
How to save Zoom in-meeting chat manually.
The Chat setting must be enabled and the Allow users to save chats from the meeting check box must be selected before you will be able to manually store your in-meeting chat for later use. In the event that you choose to save your in-meeting chat while the meeting is in progress, it will be saved locally on your computer.
To manually save an in-meeting chat, follow these steps:
- Begin by joining or starting a meeting through the Zoom desktop client.
- Once you’re in the meeting, navigate to the chat option.

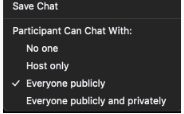
- Click on the ellipses
 at the bottom of the chat window.
 - From the menu that appears, select “Save Chat.”
This action will save your chat to your local recording location. By default, the saved chat is stored in your Documents folder under Zoom, organized by the meeting’s name, date, and time. This organized approach ensures easy access to and retrieval of your valuable chat records.
How to Automatically save chat in Zoom Meeting
Therefore, hosts do not have to manually save the text of the chat once the meeting has begun because they have the ability to automatically store all chats that take place during the meeting. It is necessary for hosts to enable the Meeting Chat auto-save feature before they may begin automatically saving in-meeting discussions and conversations.
- Go to profile settings.
- To the right of Meeting (Basic) option, click on Edit Option
- Turn on AutoSave Chat.
How to save in-meeting chat to the Zoom cloud
Licensed users with cloud recording capability can opt to save in-meeting chats directly to the Zoom Cloud when utilizing the cloud recording feature.
How to Set chats to save on the Zoom cloud
- Sign in to the Zoom web portal.
- In the navigation menu, access the Settings section.
- Navigate to the recording tab.
- Within the recording settings, use the cloud recording toggle to enable or disable this feature.
- If a verification dialog appears, click Enable or Disable to confirm the change.
- Note: If the option appears grayed out, it may be locked at the group or account level, requiring communication with your Zoom admin.
- Under Cloud recording, check the Save chat messages from the meeting / webinar box.
- In the Advanced cloud recording settings, choose the Save panelist chat to the recording box to enable additional file saving from webinars.
- This setting ensures that messages sent by panelists during a webinar to all panelists or both panelists and attendees are saved to the recording.
- Click Save to apply the changes.
How to access your saved in-meeting chats on the cloud
Accessing your meeting recording and in-meeting chats stored in the cloud can be accomplished through the following methods:
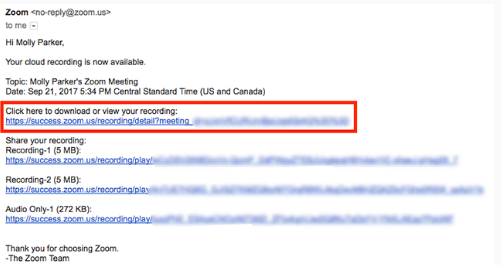
Email Notification:
- Upon completion of cloud recording, you will receive an email notification.
- Click the link provided in the email to either download or view your recording.
Zoom Web Portal:
- Sign in to the Zoom web portal.
- In the navigation menu, select “Setting” then “Recordings.”
- After that Click on the “Cloud Recordings” tab.
- Locate and click on the meeting topic of interest.
- This will display all files associated with your meeting, including the TXT file labeled “Chat file.”
- Download, share, or delete the chat file as needed.


How to access your saved in-meeting chat in the computer’s default save location
Both the in-meeting chat and the recording of it will be saved to your local recording location. In the default configuration, your Documents folder, Zoom, and a folder containing the meeting name, date, and time are displayed.
How to View the local recording path saved in-meeting chat
To configure your default recording path in the Zoom desktop client, follow these steps:
- Sign in to the Zoom desktop client.
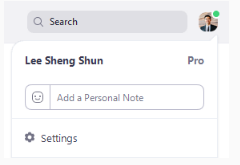
- Click on your profile picture.
- Select “Settings” from the dropdown menu.

- Navigate to the “Recording” section.
- Look for the “Store my recording at” option; this will display the currently selected default recording path.
How to Change the default save location of Zoom Local Chat Recording
To modify the local recording file location in the Zoom desktop client, follow these steps:
- Sign in to the Zoom desktop client.
- Click on your profile picture.
- Choose “Settings” from the dropdown menu (settings-button__1_.png).
- Navigate to the “Recording” section.
- Under “Local Recording,” click “Change” to modify the file location.
- Select a new destination for storing your local recordings.
Frequently Asked Questions
Where are saved chats in Zoom?
Your local recording location will be able to save the chat you have in-meeting. This folder is normally located in your Documents folder > Zoom > Folder containing the name, the date, and the time of the meeting.
Can I see Zoom chat after meeting?
Enter the email address and password that you used to register for the Zoom web portal and you will be able to log in. Go to the Account Management menu, and then click the Reports option. Select the User Activity Reports tab, then click Chat History on the right side of the screen. In the From and To fields, you will be able to specify a time frame.
How do you copy text from Zoom chat?
A code snippet can be copied by using the following method
- In order to send code snippets, you must enable the option Send code snippets.
- Using Zoom’s desktop client, you can access your account by signing in.
- You can access the chat option by clicking on the Chat tab.
- It is important to choose a chat thread in which the code snippet is embedded.
- When you have the chat window open, hover your mouse over the snippet of code.
- You will see the ellipsis icon (…) when you click the icon.
- You can copy the text by clicking the Copy button.
How long are Zoom chats stored?
The default retention period for messages in the cloud is two years, whereas the default retention period for messages on local devices is one year. Although the account owner and admin can alter the amount of unused chat storage, this change will affect all users within a given account.
What happens to Zoom chat after meeting ends?
When you save them either manually or automatically to the Zoom Cloud, you can access them later. This can be achieved using the Zoom desktop client, if you choose to use it, which allows you to save them either locally or automatically.


