

How to Enable Registration in your Zoom Meeting:best solution in 2024
Contents
What is Zoom Registration?
When you schedule a meeting that needs registration, participants will be required to register with their name, email address, and any other questions that are optional. This will enable you to collect more information about the people who will be attending the meeting. You will be able to manage your registrants, resend confirmation emails, and produce meeting registration reports after this has been arranged. If you wish to download a list of people who registered for the meeting, you can also generate these reports.
Key Benefits: how to enable registration in your Zoom meeting
- Enhanced Information Collection: Capture vital details about attendees such as names and email addresses.
- Efficient Management: Easily handle registrants and resend confirmation emails as needed.
- Insightful Reporting: Generate meeting registration reports for analysis and record-keeping.
- Data Accessibility: Download lists of registered attendees for offline use or additional processing.
How to enable Zoom Registration for your Zoom meeting
- Sign in to the Zoom Web Portal:
- Go to the Zoom web portal and sign in with your Zoom account credentials.
- Access Meetings:
- In the navigation menu, click on “Meetings.”
- Schedule or Edit a Meeting:
- Choose to either schedule a new meeting or edit an existing one by clicking on it.
- Enable Registration:
- In the meeting settings, navigate to the “Registration” section. Make sure to select the “Required” checkbox to enable registration for the meeting.
- Complete the Scheduling Process:
- After configuring your meeting settings, complete the scheduling process by saving the changes.
- Access Registration and Branding Tabs:
- Once the meeting is scheduled, you should see the “Registration” and “Branding” tabs at the bottom of your meeting options.
Exploring : How to Enable Registration in your Zoom Meeting
-
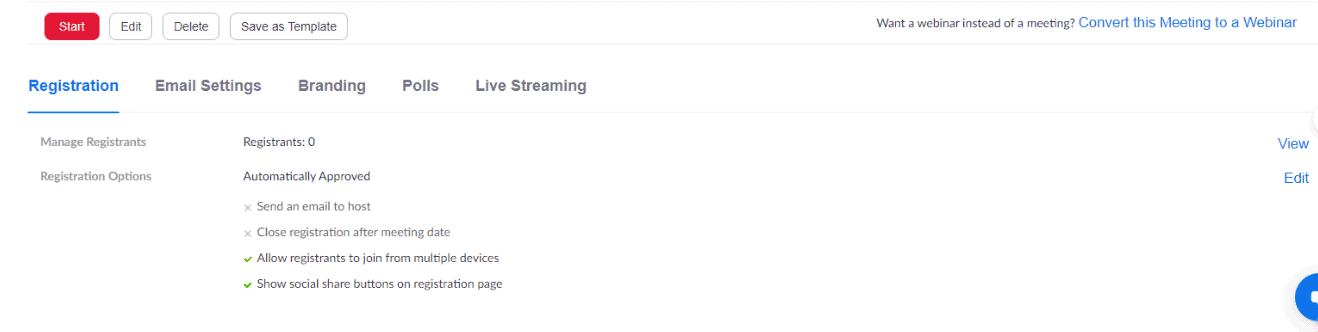
Manage Registrants:
- To oversee your meeting’s registrants, navigate to your Zoom meeting settings and locate the “Manage Registrants” option.
- Click on “View” adjacent to “Manage Registrants” to access a comprehensive list of individuals who have registered for the meeting.
- By clicking on a registrant’s name, you can delve deeper into their details, gaining valuable insights about their participation.
2. Edit Registration Options:
-
- Within the meeting settings, locate the “Registration Options” section to customize registration settings.
- Click on “Edit” next to “Registration Options” to fine-tune and adjust the registration parameters according to your preferences.
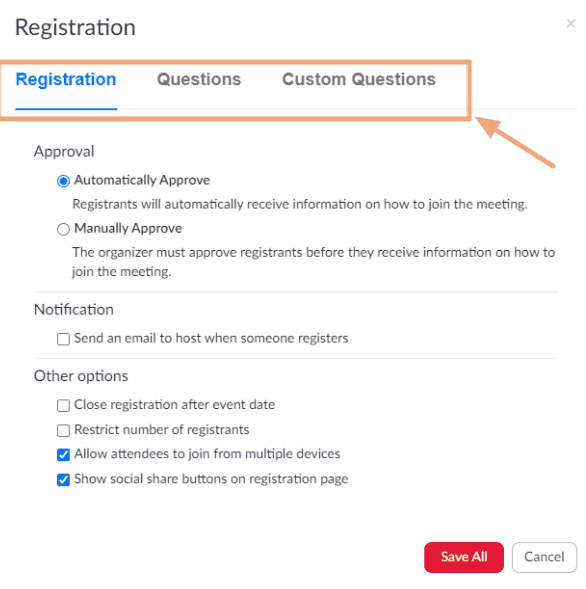
- In this section, you have the flexibility to add or remove registration questions, tailoring the registration process to suit your specific requirements.
- Additionally, you can create custom questions for participants, enabling you to gather relevant information tailored to the nature of your meeting or event.
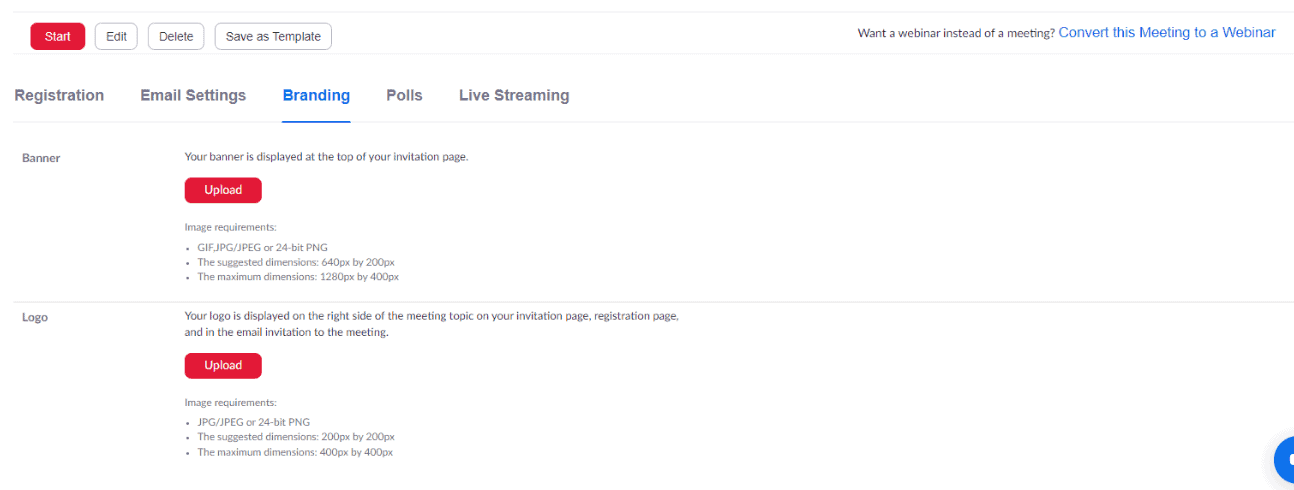
Branding tab:
While I can’t see the actual screenshot, based on your description, the “Branding” tab in Zoom allows you to customize the appearance of your meeting invitation and registration pages. Here’s a general guide on how you can use the Branding tab:
- Access the Branding Tab:
- After scheduling a meeting in the Zoom web portal, go to the meeting settings.
- Click on the “Branding” tab to access the branding customization options.
- Add a Banner:
- Within the Branding tab, locate the option to add a banner.
- Upload an image or select a banner that you want to be displayed at the top of your invitation page.
- Add a Logo:
- In the same Branding tab, find the option to add a logo.
- Upload an image or select a logo that you want to be displayed on the right side of the meeting topic on your invitation page, registration page, and in the email invitation to the meeting.
- Save Changes:
- After adding the banner and logo, ensure to save your changes to apply the branding customizations.
FAQs on How to Enable Registration in Your Zoom Meeting
1. What is Zoom meeting registration, and why should I use it?
- Zoom meeting registration allows you to require participants to register before they can join your meeting. This helps you manage attendance, gather participant information, and control access to your meetings effectively.
2. How can I enable registration for my Zoom meeting?
- To enable registration for your Zoom meeting, first, log in to your Zoom account and navigate to the “Meetings” tab. Then, click on the meeting you want to enable registration for, go to the “Registration” section, and toggle the switch to enable registration.
3. Can I customize the registration form for my Zoom meeting?
- Yes, you can customize the registration form to collect specific information from participants. You can add custom questions, require certain fields, or remove unnecessary ones to tailor the form according to your needs.
4. What information can I collect from participants during the registration process?
- You can collect various information such as name, email address, company/organization, job title, and any other custom questions you choose to include in the registration form.
5. Is it possible to automate approval for registrants in my Zoom meeting?
- Yes, you can automate approval for registrants by setting up automatic approval or manual approval options. Automatic approval allows registrants to receive a confirmation email with the meeting details immediately after registering, while manual approval requires you to review and approve registrants before they receive the meeting details.
6. Can I limit the number of participants who can register for my Zoom meeting?
- Yes, you can set a limit on the number of participants who can register for your Zoom meeting. This helps you manage the capacity of your meeting and ensure that it doesn’t exceed the maximum number of attendees you can accommodate.
7. How do participants register for my Zoom meeting?
- Participants can register for your Zoom meeting by visiting the registration link provided by you or by accessing the registration page through your website or email invitation. They will need to fill out the registration form with the required information to complete the registration process.
8. Can I track and manage registrants for my Zoom meeting?
- Yes, you can track and manage registrants for your Zoom meeting through the “Registration” tab in your Zoom account. You can view a list of registrants, see their registration status, approve or deny registrants, and send reminders or follow-up emails to registrants as needed.
9. Is there a deadline for participants to register for my Zoom meeting?
- Yes, you can set a registration deadline for your Zoom meeting to specify the last date and time by which participants can register. Once the deadline passes, registration will be closed, and no further registrations will be accepted.
10. What happens after participants register for my Zoom meeting?
- After participants register for your Zoom meeting, they will receive a confirmation email with the meeting details and a unique link to join the meeting. You will also receive notifications about new registrants and can manage their registration status accordingly.
