
[Administrator] Set Zoom Room in Microsoft Exchange 2010
Before adding Calendar service for Zoom rooms, the Exchange administrator must do the following:
- Create a dedicated user who can manage calendars in Exchange.
- Create or search calendar resources for use in each Zoom room.
- Allows dedicated users to delegate full access to each calendar resource.
- Allow dedicated users to edit each calendar resource.
Once the Exchange administrator has completed these steps, use dedicated user credentials to provide the Zoom room in your account with approval to use the calendar service and all its calendar resources.
Contents
- 1 Prerequisites
- 2
- 3 Procedure
- 3.1 Section: (1) Create Zoom Room Service Account
- 3.2 Section: (2) Create or get a room and room email address
- 3.3 Section: (3) delegate room to zoom room service account
- 3.4 Section: (4) Enable Basic Authentication or NTLM Authentication
- 3.5 Section: (5) Find the EWS URL
- 3.6 Section: (6) Disable Deletion of Subjects from Room Events
- 3.7 Section: (7) Add Calendar Service to Zoom
- 3.8 Frequently Asked Questions
- 3.9 How do I link Zoom Room in Outlook?
- 3.10 How do I change Zoom Room settings?
- 3.11 How do I set Zoom in the room admin?
- 3.12 What is the difference between a Zoom owner and administrator?
- 3.13 How do you make a Zoom room always open?
- 3.14 Where is the Zoom room ID?
- 3.15 How do you make a personal Zoom room?
- 3.16 How do I change the Zoom room name?
- 3.17 What is the difference between a Zoom meeting and a personal meeting room?
- 3.18 Related Articles
Prerequisites
- Exchange administrator account
- Ability to create and manage room calendars
- Ability to create new Exchange users
Read it also –
| Administrator Set Zoom With Adfs |
| Administrator Set Zoom App With Onelogin |
| How To Set Zoom As Default For Google Calendar |
Procedure
Section: (1) Create Zoom Room Service Account
- Start EMC (Exchange Management Console) .
- Select Mailbox under Microsoft Exchange> Microsoft Exchange On Premise (your_server’s_domain)> Recipient Settings .
- Right-click [Mailbox] and click [New Mailbox …] .
- Select User Mailbox and click Next on the New Mailbox dialog .
- Add New User and click Next .
- Create a new user email address, such as room@company.com .
- This same user’s email address is used in all Zoom rooms.
- ” User logon name (user principal name) and” ” password Make a note of the”.
- Complete the remaining steps.
Section: (2) Create or get a room and room email address
- Start EMC (Exchange Management Console) .
- Select Mailbox under Microsoft Exchange> Microsoft Exchange On Premise (your_server’s_domain)> Recipient Settings .
- Write down ” Room Name ” and ” Primary SMTP Address ” next to it .
Section: (3) delegate room to zoom room service account
- Start EMC (Exchange Management Console) .
- Select Mailbox under Microsoft Exchange> Microsoft Exchange On Premise (your_server’s_domain)> Recipient Settings .
- Right click on the first room and select Properties .
- Switch to the Resource Policy tab. Click Add under Specify a proxy for this mailbox .
- In the Select Recipients dialog, select a dedicated email and click OK .
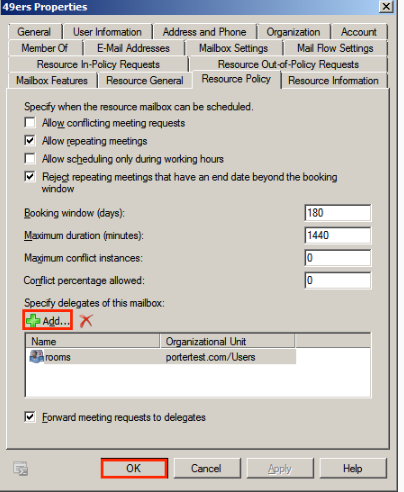
- Switch to the [Resource General] tab.
- Check Enable Resource Reservation Attendant .

- Click OK to save your changes.
Section: (4) Enable Basic Authentication or NTLM Authentication
The Zoom room supports basic authentication and NTLM authentication formats for on-premises solutions such as Exchange servers. Use the following to enable which applies to your account.
Basic authentication
- Start “Server Manager” on Windows Server.
- Navigate to Internet Information Services (IIS) Manager under Roles.
- Select Web Server (IIS)> EWS under Sites.
- Select Default Web Site and double-click Authentication under IIS.
- Right-click Basic Authentication in Function View, and then click Enable.

Enable NTLM authentication
- Open the Exchange Management Console and navigate to Server Configuration / Client Access .

- In the Actions pane on the right side of the Exchange Management Console, click Enable Outlook Anywhere .

- Enter the external host name in the field displayed here .

Section: (5) Find the EWS URL
- Ctrl + right click on the Outlook icon in the notification area at the bottom right of the screen .
- Select [Test E-mail Auto configuration] .
- Enter your email address and password .
- Select the Use automatic detection box (other check boxes can be cleared).
- Click the Test button.

- Make a note of the ” availability service URL ” (EWS URL).

Section: (6) Disable Deletion of Subjects from Room Events
- Start EMC (Exchange Management Console) .
- Select Mailbox under Microsoft Exchange> Microsoft Exchange On Premise (your_server’s_domain)> Recipient Settings .
- Right-click the first room, click Properties and then click the
- Switch to [Resource Information] and uncheck the following options.
- Delete a comment
- Delete the subject
- Add the name of the host to the subject
- Remove private flag in approved meeting
- Click OK to save your changes.


Section: (7) Add Calendar Service to Zoom
- As the Zoom Room administrator ZoomWeb portal to sign you.
- Select Calendar Integration , and then click Add Calendar Service.
The Add Calendar Service dialog is displayed.
- Exchange section in the [Add] and then click.

- Enter the email address and password of the calendar service dedicated user.
- Select the Exchange version .
- Enter the Exchange login domain , if necessary .
- Enter the EWS server URL . Be sure to include the entire URL , including the https: // part .
- Click [Approve] .
The Calendar service you added is displayed on the Calendar Integration page.

- See ” Adding a Zoom Room ” for information on setting up a calendar resource using the Zoom room
.
Frequently Asked Questions
How do I link Zoom Room in Outlook?
How to schedule meetings with the Zoom desktop client
- Set up your meeting settings and schedule a meeting.
- Select Outlook from the Calendar section.
- Save your changes. …
- The room’s email address should be entered in the To: field. …
- The invitation will be sent to the recipients once you click Send.
How do I change Zoom Room settings?
Here’s how to access Zoom’s settings. Zoom’s web portal can be accessed by logging in. Zoom Rooms can be found under Room Management.
How do I set Zoom in the room admin?
Zoom’s web portal can be accessed by logging in. Then click Zoom Rooms under Room Management. You can create admins for specific rooms or locations using location hierarchy. To create administrators for your entire account, click Account Settings.
What is the difference between a Zoom owner and administrator?
Managing roles is one of the responsibilities of the owner. A user can be added, removed, or edited by an administrator. API, SSO, and Meeting Connector are some of the advanced features that can be managed. Admins do not have any administrative rights as members.
How do you make a Zoom room always open?
Zoom’s profile page can be accessed by clicking Meetings. Schedule a new meeting by clicking the Schedule New Meeting button. The meeting information should be entered.
Where is the Zoom room ID?
Zoom Rooms can be found under Room Management. The name of the room can be edited by clicking the Edit button. The Setup section can be found there. Room Meeting ID can be accessed by clicking the icon.
How do you make a personal Zoom room?
Access the Zoom web portal by logging in. Navigate to the Profile section. Personal Meeting ID can be edited by clicking Edit to the far right.
Using Personal Meeting ID (PMI) for instant meetings
- Click Meetings.
- Click Personal Meeting Room.
- Click Start. …
- Click Save.
How do I change the Zoom room name?
Zoom’s web portal can be accessed by clicking Room Management. Then click Devices under Zoom Rooms. A device enrolled in an MDM service can be renamed by clicking the Rename icon to the right. If you want to change the device’s name, enter it here and click Rename.
What is the difference between a Zoom meeting and a personal meeting room?
Is there a difference between a personal meeting ID and a scheduled meeting ID? Meeting IDs for Personal Meetings are static, and owners can change them at any time, while Meeting IDs for Scheduled Meetings are generated upon creation and deleted after the meeting.
