
There are a number of analog devices that can be used in conjunction with Zoom Phone using the AudioCodes MediaPack (MP1288) gateway. For more information about AudioCodes, please visit their website.
The following topics are covered in this article:
- Required components
- Main components
- FXS blade
- Setup diagram
- How to configure network settings
- (1) Obtain the IP address of the MP1288
- (2) Obtain the MAC address of the MP1288
Contents
- 1 Required components
- 2 Main components
- 3 How to configure network settings
- 3.1 Obtain the IP address of the MP1288
- 3.2 Obtain the MAC address of the MP1288
- 3.3 Frequently Asked Questions
- 3.4 Is there a user manual for Zoom?
- 3.5 What are the basic features of Zoom?
- 3.6 How do you present in Zoom step by step?
- 3.7 Does Zoom record your whole screen or just the meeting?
- 3.8 Can Zoom record without you knowing?
Required components
If you are planning to deploy your Audiocodes MP1288, please be aware of the following information.
Your device should be delivered with the following items (in addition to any other items that could be ordered separately and that you may have already ordered):
- Two brackets for mounting the 19-inch rack to the front of the enclosure
- This package includes the following components: A RJ-45-to-DB-9 serial cable adapter for serial communications (AC-powered models) Two AC power cords
- DC terminal blocks (for models powered by DC)
- There is one * grounding lug included in the kit
- Document containing regulatory information about this product
Main components
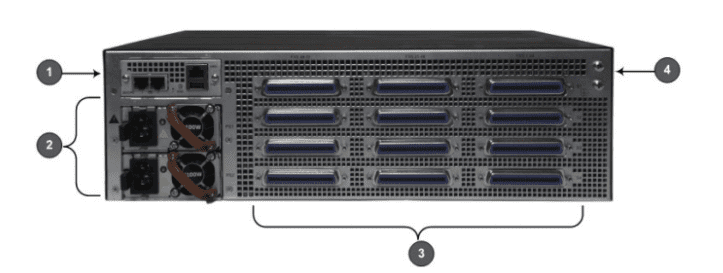
| Item number | Label | Description |
| 1 | CPU | It provides a central processing unit (CPU) as well as various peripheral components An interface for connecting to the network over a network port. |
| 2 | PS1 / PS2 | voltage supply kits. There are two of each power supply kit. |
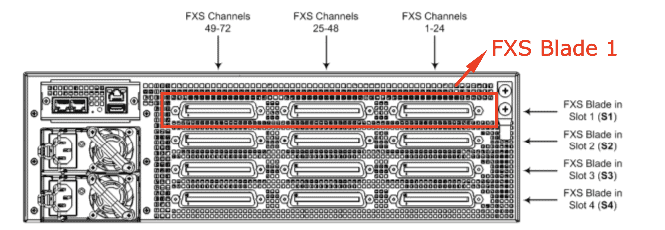
| 3 | Blades: S1 / S2 / S3 / S4FXS ports: FXS 1-24 / FXS 25-48 / FXS 49-72 |
– Blades with FXS ports providing access to FXS interfaces. |
| 4 | |
Grounding lugs or wires for ESD-preventive equipment or a grounding wire can be connected to the grounding lugs so that they can provide a protective grounding. |
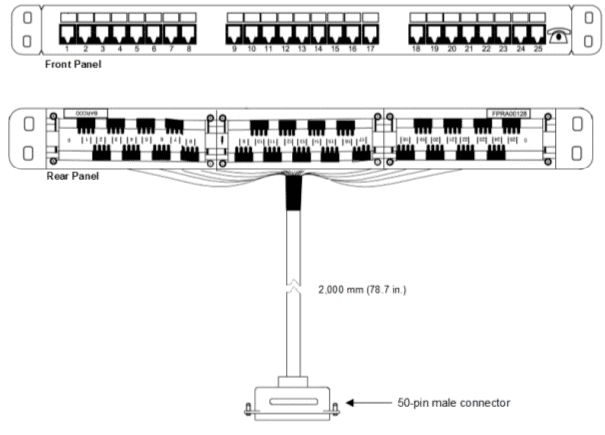
FXS blade
If you want to provision the MP1288 and have it compatible with analog devices, you will need to include in your setup the patch-panel 50-pin Centronics Amphenol cable that has 24-ports RJ11 breakouts in the patch-panel connector. Should the product you are looking for not be included, please contact AudioCodes or another supplier:
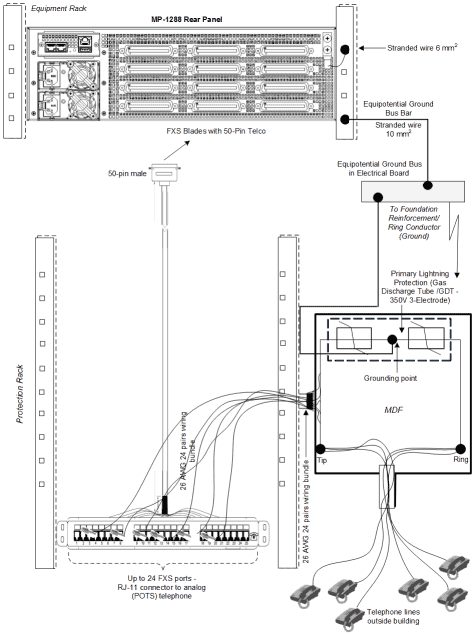
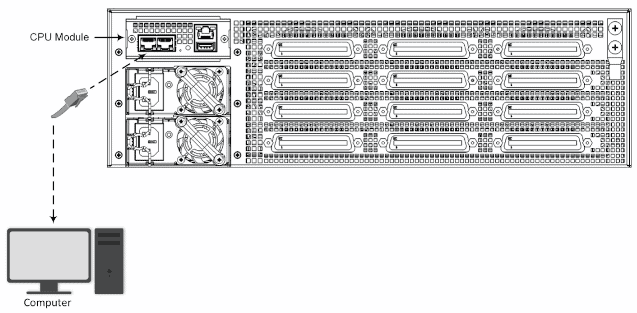
Setup diagram
It is recommended that the MP1288 be set up as follows:
How to configure network settings
Important: The MP1288 web interface should be accessed using a static IP address, as it is the most reliable way to access the interface.
Obtain the IP address of the MP1288
In order to access the device’s web interface, you should use the device’s factory default IP address (192.168.0.2/24) and default gateway (0.0.0.0) to begin with, and then modify it to match the addressing scheme of your network for future use.
- Connect any Ethernet port on the CPU module (rear panel) to the LAN port on your computer by using a shielded twisted pair (STP) straight-through RJ-45 Ethernet cable formed from CAT-Se/6 shielded twisted pair (STP).
- It is essential to update your computer’s IP settings in order to match the default IP address and subnet mask of the mobile device.
- The first thing you need to do is open a web browser (for example, Google Chrome) on your computer.
- Enter the default IP address of the device in the URL field.
As soon as the web login screen appears, you will be able to access your account. - Click Login when you have entered the default username (Admin) and password (Admin), and then enter the password.
- Click on the IP Network tab of the Settings menu and then select the Core Entities folder and then select IP Interfaces from the list that appears.
- The OAMP interface should be selected. You can choose OAMP + Media + Control from the drop-down menu that appears when you select the Application Type. When you click Edit, a dialog box will appear, where you can modify the interface used by the device.
- Apply the changes by clicking the Apply button. Whenever you try to connect to the device using the default IP address, you are not able to do so. By using the new IP address, the device can be accessed from anywhere in the world.
- Your computer’s IP settings should be changed to correspond with the new IP addresses and subnet of the OAMP device once you have changed the PC’s IP settings.
- By using the new IP address of the device, you will be able to access its web interface.
- Click the Save button on the toolbar of the web interface in order to save the changes.
It is likely that the device’s flash memory will be used to store the new IP address. - It is necessary to re-enable the device so that it can connect to the network that is needed. By using the new IP address, you will be able to access the device’s management interface remotely from a remote location.
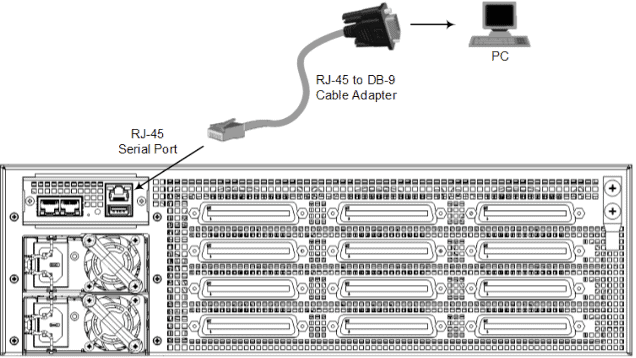
Using the device’s command-line interface (CLI), you can find out the IP address of the device, if it is using DHCP to obtain an IP address from a DHCP server. It is also possible to access the device using RS-232 by connecting a VT100 terminal to it or by using a terminal emulator program (for example, HyperTerminal) with a computer to access it using RS-232.
- The RJ-dS connector supplied with the kit should be connected to the COM port on the CPU module (labeled |0|0|), and the RJ-dS connector should be connected to the RS-232 COM port on your computer through the supplied RMS to 08-9 female cable adapter.
- A terminal emulator program such as HyperTerminal can be used to establish a serial connection with the device. In order to communicate with the server, the following settings should be used:
- 115200 baud rate
- 8 data bits
- No parity
- 1 stop bit
- No flow control
- The user name (by default, it is Admin) should be typed at the CLI prompt:
-
Username: Admin
- If prompted for a password, type the following (Admin is the default password):
Password: Admin
- The following command should be typed at the prompt:
MP-1288 FX5> show system version
- In the example below, you will be able to see the IP address the device obtained through DHCP, as shown in the output of this command:
Version info:
---------------
;Time 8 Date: 08/07/2020 11:13:34
;Device Up Time: 0d:2h:33m:53s
;Board: MP-1288 FXS
;Board Type: 86
;Serial Number: 9164073
;Software Version: 7.20A.256.399
;DSP Software Version: 5033AE3_R => 723.04
;Board IP Address: 10.15.77.128
;Board Subnet Mask: 255.255.0.0
;Board Default Gateway: 10.15.0.1
Changing the IP network settings for your MP1288 in order to configure it with a static IP address is as simple as following the instructions above. During the process, the MP1288’s currently running portal (with its default IP address) will no longer respond and the new IP network settings will be implemented. There is a high probability that the portal will not be accessible if the settings are not done correctly. In order to restore the IP network settings, you will need to perform a factory reset on your device.
Obtain the MAC address of the MP1288
In order to obtain the MAC address, you need to access the MP1288’s web interface after you have changed the network settings:
- To access the MP1288’s web interface, you will need to enter the IP address of the MP1288 in a web browser:
http://your_IPv4
Note: Admin and Admin are the default user name and password for the system, respectively. - MAC addresses can be obtained by clicking MONITOR then Device Information under the SUMMARY tab.
- The MP1288 should be added to the Zoom web portal so that it can be accessed by users.
Read it also –
| Setting Up Faxing Audiocodes Mp1288 In Zoom |
| Setting Up An Audiocodes Mediapack Mp 11X 124 1288 Series Ata In Zoom |
| Setting Up Faxing Audiocodes Mp1Xx Series In Zoom App |
Frequently Asked Questions
Is there a user manual for Zoom?
What are the basic features of Zoom?
- Virtual Meetings. Zoom Meetings are a virtual meeting platform that allows users to connect virtually from anywhere.
- Chat with your team members. Using Zoom Chat, you will be able to collaborate together.
- System for VoIP telephony. With Zoom Phone, you can call anywhere in the world.
- A whiteboard that can be viewed online. Zoom Whiteboard is an easy-to-use tool that allows you to create and brainstorm.
- The concept of conversational intelligence is discussed in more detail below. To improve sales, you need powerful conversation analytics.
How do you present in Zoom step by step?
- Step 1: Download and install Zoom.
- Step 2: You will need to log in to your Zoom Account.
- Step 3: The next step is to test the audio and video settings.
- Step 4: Set up a meeting or join a meeting.
- Step 5: Click the “Open Presentation” button on the screen.
- Step 6: Let your audience know about your Presentation.
- Step 7: Put an end to the presentation by stopping the sharing of the Presentation.
Does Zoom record your whole screen or just the meeting?
Can Zoom record without you knowing?
Related Articles