
In most video layouts (Speaker, Gallery, Side-by-side), you will find the watermark feature superimposing an image of the email address of the participant on their video and over their shared content in most applications. As well as displaying one instance of the watermark, you can also display several instances, so that the watermark is more noticeable across the entire screen.
As a result of this feature, you can secure the information that you share during a meeting and make sure that all content that you share or share confidentially belongs to you.
- Admins and account owners who want to use the watermark feature first need to enable the feature Only authorized users can join meetings, or at the user level, they can enable the setting Require authentication to join meetings at the level of the individual. For this reason, participants will be required to verify their identities before they can access the meeting.
- Zoom will be the only possibility for participants to verify their identities. There are other scheduling tools that do not have the capability of having this option available with additional options, including the Zoom desktop client or the Microsoft Outlook plugin or add-in even when the “Require authentication to join” option is enabled.
- Click here for information on screen sharing security.
Contents
Prerequisites for adding a watermark
- Ownership of the account or admin privileges
- Basic watermark (showing only a portion of the email)
- Zoom desktop client
- For Windows: 3.5.44008.0314 or higher
- For macOS: 3.5.44022.0314 or higher
- Zoom mobile app
- For Android: 4.1 or higher
- ForiOS: 4.1 or higher
- Zoom desktop client
- Enhanced watermark (full email address displayed)
- Zoom desktop client
- For Windows: 5.8.6 or higher
- For macOS: 5.8.6 or higher
- For Linux: 5.7.6 or higher
- Zoom desktop client
enabling a watermark on your account
Account
For users in the account that wish to add a watermark, the following steps should be taken:
- As an administrator, you have the ability to edit the Zoom account settings as soon as you log into the Zoom web portal.
- You simply click on Account Management, then Account Settings, following the instructions.
- You then click on Meetings.
- You can toggle the Add watermark toggle under the Schedule Meeting category, so that it is enabled or disabled according to your needs.
- In the event that a confirmation dialog appears, click Enable or Disable to ensure that the change has been made.
- If you are selecting it to be mandatory for all users in your account, first click on the lock icon, then when you have confirmed it, click Lock again to apply the setting to all users.
- Customize your watermark (Optional): Customize the watermark’s settings.
- Choose from the following options (Optional):
- Allow hosts to override watermark settings:
- This allows users to change the customized watermark settings for the account.
Note: - When the Add watermark setting is locked, this option will automatically be disabled.
- By default, watermarks should appear on all meetings, such as those scheduled through the use of calendar integrations:
- By default, the watermark should appear on all meetings. If you want it to appear by default, uncheck the checkbox. This option is enabled by default. If this option is enabled, and the Add watermark setting is set to Lock, all meetings will use the watermark, and users are not able to disable it.
Group
A group of users can have their watermarks added or disabled using the following method:
- You must be a privileged administrator with the ability to edit groups in order to access the Zoom web portal.
- Select User Management from the navigation menu, and then select Group Management from the list of options.
- From the list of groups, click on the appropriate group name.
- On the Meetings tab, click OK.
- If you click on the Add watermark toggle under the Schedule Meeting category, you will be able to choose whether to enable it or not.
- You are asked to verify the change by clicking Enable or Disable if a validation dialog appears.
- For users in your account who don’t have access to these options, you should click the Lock icon, and then click Lock to confirm the setting when you have done so.
- You can change the watermark customization settings by clicking the Customization icon.
- Click on the following options to customize the watermark:
- Enable hosting to override the watermark settings: The user is given the ability to customize the watermark settings within the group.
- Note: Once the Add watermark option has been locked, this feature is automatically disabled.
- By default, watermarks will be displayed for all meetings, including those arranged through calendar integration: Default to displaying watermarks for all meetings. To turn watermarks off by default, merely deselect the check box. Whenever this option is enabled, as well as the Add watermark setting is locked, watermarks will be automatically applied to all meetings, and users will not be able to turn them out through the meeting settings.
User
Add watermark for your own use can be enabled or disabled by following the steps below:
- Join the Zoom web portal by logging in.
- Then click Settings in the navigation panel.
- Select Meeting from the drop-down menu.
- To enable or disable the watermark, you can toggle the Add watermark toggle under the Schedule Meeting category.
- You can verify that your change was made by clicking Enable or Disable if the change verification dialog appears.
Note: It is possible to lock an option at either the account or group level, if that option is grayed out at the moment. Contact the Zoom administrator if this is a problem for you. - Changing the customization settings for the watermark (optional):
Watermark customization settings
If you want to adjust the appearance of the watermark during a meeting or webinar, you can do so by altering the following settings:
single instance: In this case, the watermark is displayed in a single instance.
- Repeated: This watermark will be displayed multiple times.
- Visible on: Depending on the scheme you decide to use, you can either display the watermark on Shared Content, on Video Feeds, or both.
- Opacity level: You can adjust the opacity level by dragging the circle between 5 and 100% by clicking and dragging the circle. The lower the opacity level, the more transparent the watermark will be. The watermark will be visible just like the underlaying video or shared content underneath.
using the watermark feature
- You will need to log into the Zoom website to get started.
- Click Meetings or Webinars under the navigation menu on the top.
- Once you get there, click Scheduling Meetings or Scheduling Webinars.
- Under Security, make sure the checkbox is selected to enable Authentication is required to join.
- Next, click on the Show option.
This will display further options for meetings or webinars. - Make sure the check box next to Add a watermark that identifies the viewer is selected.
Note: The only way to enable these features is to contact the Zoom administrator in order to have their administrator enable the checkboxes Require authentication to join and Add a watermark to identify the viewer of a Zoom meeting.
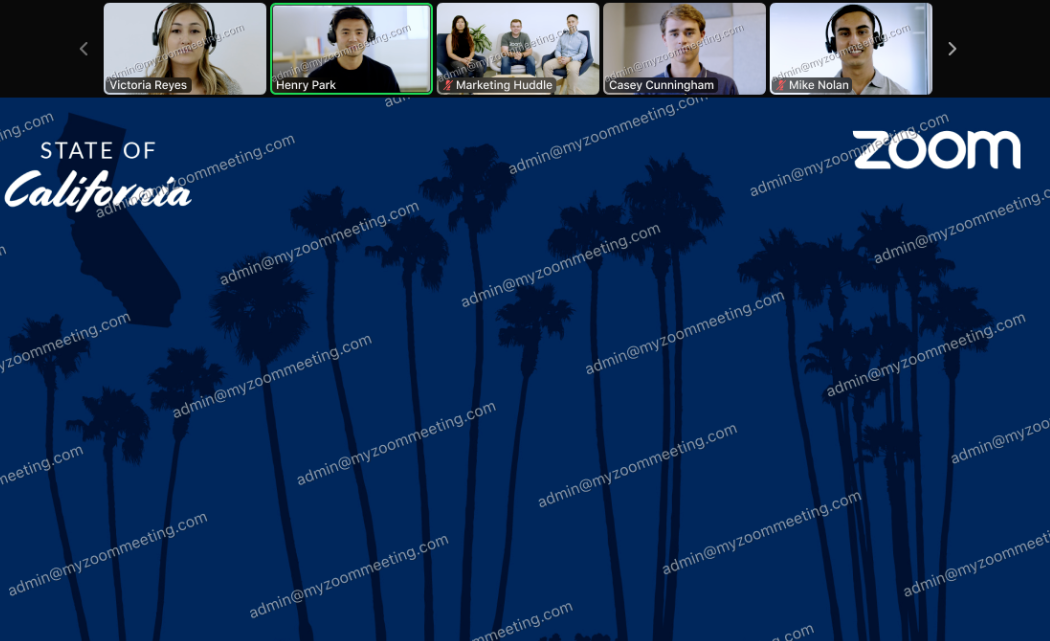
The email address of the user who is viewing the content during a meeting or a webinar during which a sharescreen is shared will be displayed on the shared content, as well as on the video of the other visible participants during a meeting. The below watermark will be patterned across any shared content as well as the videos being viewed by the participants, as shown below: If admin@myzoommeeting.com is viewing shared content, the watermark of admin@myzoommeeting.com will be patterned across both.
Read it also –
| How To Add Audio Watermark In Zoom App |
| Zoom Audio Watermark Feature Administrator |
| How To Custom Live Streaming Watermark In Zoom App |
Frequently Asked Questions
Can I add a logo to my Zoom background?
How does Zoom watermark work?
Why is my Zoom watermarked?
How do I remove a watermark from Zoom as a participant?
The Watermark setting can be added or removed from the meeting settings by using the Add or Remove Watermark button
Please follow the instructions below to log into the Zoom web portal by going to http://ucsb.zoom.us/signin/ and following the instructions. On the left side of the screen, click the “Meetings” link. Click the button that says “Schedule a Meeting” while you are going through the scheduling process. In the “Meeting Options” section, scroll down to the “Add a watermark that identifies the viewer” and click on it.