
Zoom integrates cloud video conferencing, simple online conferencing, and group messaging into one easy-to-use platform. Zoom ‘s solution provides the best video, audio, and wireless screen sharing experience across multiple platforms. This article describes the basic features of the Zoom client on Windows and Mac .
Contents
Prerequisites
How to Sign in and join
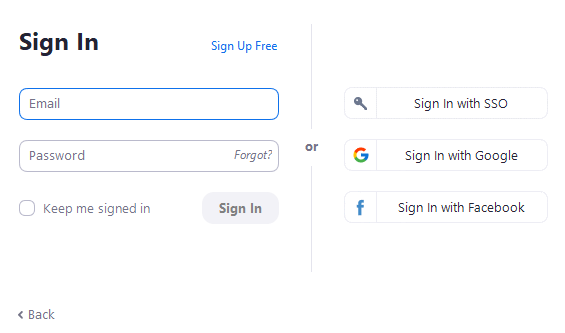
After starting Zoom , click Join Meeting without logging in. Click Sign In to schedule a login and meeting.

Using your Zoom account, Google account, or Facebook account will allow you to login. The SSO feature will also allow you to login. You will need to sign up for a free account if you do not already have one. Those of you who have a Zoom account but have forgotten their password can click the Forgot Password link
Home Screen
After signing in, you can click on each Home option. When you sign in to the application, the main dialog box is displayed. The default tab is Home .
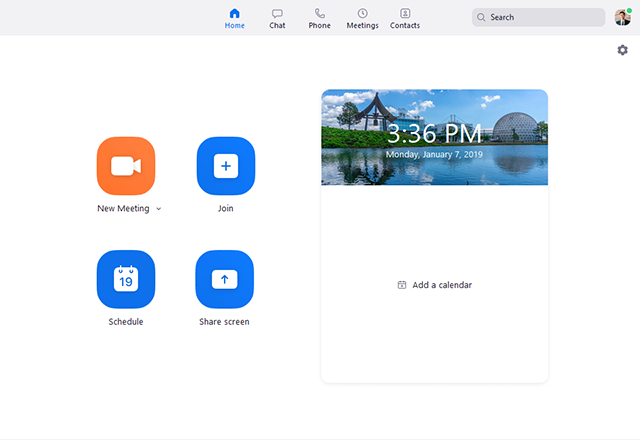
Home screen description:
- New Meeting : Starts an instant meeting .
You can click the arrow to enable video or choose whether to use My Personal Meeting ID (PMI) . - Join : Join a meeting allows you to join an ongoing meeting.
- Schedule : Set up a future meeting You can schedule (set up) a meeting .
- Screen sharing : Zoom Room screen to share a shared key or the meeting ID to enter the, Zoom Room to the PC , you can share the screen of the mobile.
- Change date and time and background image: Place the cursor on the photo and click the Camera icon.

- Upcoming Meetings: The next meeting of the day is displayed. You can sync upcoming meetings by adding a third-party calendar service .
Click on your profile picture for the options below.

- If you would like to write a personal note, please do so.
- Settings:
- The client allows you to change the access settings.
- Changing your status to Available, Away, or Do Not Disturb will let your contacts know where you are.
- My Profile:
- To update your profile, go to the Zoom web portal.
- Try Top Features:
- You will find information about some of Zoom’s most popular features on this page.
- Help
- About Zoom:
- This page gives information about the Zoom client you currently have installed as well as other pertinent details about your company.
- Help Center:
- A link to Zoom’s support page will be displayed.
- If you encounter any problems, please report them. Contact Zoom to report any problems
- Check for Updates:
- Make sure that Zoom is up to date.
- Change to Portrait View:
- If you prefer a narrower window, make sure you switch the Zoom window to portrait view.
- Switch Account:
- Switching between multiple accounts can be done quickly with the Switch Account feature.
- Sign out
- From your current account and then upgrade to the Pro plan.
Meeting
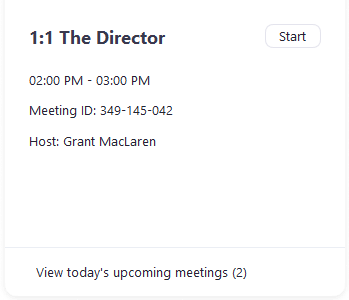
Click the Meetings tab to view, start, edit, and delete upcoming scheduled meetings.
After selecting a scheduled meeting in the left panel, you can click the following options:
- Add icon : Schedule a new meeting .
- Refresh icon : If you do not see the webinar page. Here you will see a list of scheduled meeting, refresh the meeting list.
- Start / Join : Start a scheduled meeting What you selected for the next meeting.
- Copy Invitation : Copy of Scheduled Meeting You can manually paste it into invitations , emails, instant messengers, and more. Show Meeting Invitations If you want to see the invitations you are copying.
- Edit : Edit Meeting Options For your scheduled meeting.
- Delete : Permanently deletes the scheduled meeting.
Operations during a meeting
When you start or join a meeting, you can access the meeting controls at the bottom of the meeting window ( move the mouse in the Zoom window to see the meeting controls).
Meeting Control Details Hosts , co-sponsors , and attendees . You can also join a test meeting Get used to controlling the meeting before joining a scheduled meeting.
Contact Address
[ Contact] to view and manage.- Contacts : Shows directories for all contacts. Starred , external, and auto-answer contacts. If your organization has Zoom Rooms , you will also see the Zoom Rooms list.
- Channels : Show channel directories (used for group messaging). Starred channels appear at the top of the list.
- Add Icon
 : View Options Contacts and Channels . You can add contacts, create contact groups, create channels, or join channels.
Chat

The left panel gives you access to the following features:
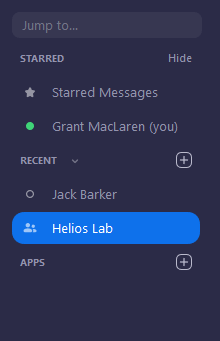
- Jump to search box : Search for contacts or channels.
- < > : This allows you to quickly switch between recent chat windows that have been used.
- Star mark has been set : Displays a message with a star mark. (With star mark )
- Click on the name to go to your personal chat space .
- New Chat or Channel ( Next to Recent ): You can start a new chat. For group chats, you can create a channel or join an existing channel .
- Recent: View chat history and continue chatting.
A status icon appears next to the contact’s name . - Select a channel (indicated by the group icon in front of its name) to view the channel’s chat history and send a message to channel members.
- You can use the following features in the chat window by selecting a contact or channel in the left panel.
- Star icon ( starred list ): Quickly access those contacts and channels.
- Video icon: Start a meeting with your contacts. If a channel is selected, a meeting with all members of the channel will be started.
- Open in new window (move the pointer over the contact or channel name to see this icon): Opens the selected chat in a new window.
- More info: You can view additional options for contacts or channels, as well as files, images, and starred messages shared in chat .
- Message Box: Compose a message and send it to a contact or channel. ( Screenshots , files , code snippets , and animated GIFs )