
https://youtu.be/kQfIDkE2PGM
Participants can schedule Zoom meetings via the Zoom Scheduler Extension for Chrome, which will allow them to access Google Calendar directly from Zoom meetings. It is possible to start a meeting instantly or to schedule a meeting for a later date if you’re using the extension. A link and details of the join meeting can be added to the calendar event and can be sent as a Google Calendar invitation, allowing the attendee to join the meeting by simply clicking the event in the calendar on their phone.
Meetings can also be webinar page. Here you will see a list of scheduled by using the following additional methods:
- The Zoom desktop client or Zoom mobile app can be used to schedule meetings
- From the Zoom web portal or by using the Zoom desktop client
- with the Zoom Scheduler plugin (Chrome, Outlook, Firefox)
Contents
Prerequisites for the Zoom Scheduler Extension for Chrome
- Chrome is a web browser developed by Google Inc.
- The Zoom Chrome extension can be downloaded from the Google Chrome Web Store
- Accounts can be created using Google, the work email address, or a Single Sign-On (SSO) account
- account
- account. The meetings can be scheduled using Google Calendar
How to install the extension
Installing the Zoom Scheduler extension from the Chrome Web Store is required before you can simply schedule meetings with the Chrome extension or directly in your Google Calendar. To add the Zoom Scheduler extension to Chrome from the extension window, click the Add to Chrome button.
How to use the extension
- An icon will appear next to your Chrome address bar after installing the Zoom Chrome extension. Simply click on the icon and you will be taken to the Zoom Chrome extension.
- Using any of the Google sign-in methods, your email and password, or SSO, you must log in to your Zoom account.
- The Chrome Extension will give you additional options once you have logged in.
- Schedule a Meeting: The next step is to open a new meeting on Google Calendar by clicking Schedule a Meeting.
- Start a Meeting: Select either Start a Meeting with Video or Start a Meeting Without Video by hovering your mouse over Start a Meeting.
- Name/email address: The Zoom profile page can be accessed by clicking your name or your email address.
- Gear icon : To open Zoom meeting settings, select the gear icon from the top right of the Zoom meeting window.
Read it also –
How to schedule a meeting from Google Calendar
The Zoom extension allows you to schedule a meeting directly in your Google Calendar event so that the meeting is considered a Zoom meeting by default. The event details will automatically be enhanced with the join URL and meeting details once the event has been scheduled.
Notes:
- You can sync your default meeting settings from the Zoom web portal with the Zoom Scheduler extension.
- You can choose if other users are able to manage your meetings that are signed up as private in Google Calendar or Outlook when you assign scheduling privileges to them at the Zoom web portal. There is no way for the users to view the invite link, a meeting topic, or the attendee list if they cannot manage private events.
- Edit a calendar event created in the past or add a new event to the calendar.
- The event will be displayed with additional options.
- Click the More Options link to add a new event to the calendar.
- The pencil icon appears if the event is already on the calendar.
- To make it a Zoom meeting, click Make it a Zoom Meeting.
In the description text box, the meeting details will be filled in using your default settings, resulting in the creation of a Zoom meeting. - The calendar event options include inviting guests, setting notifications, and adjusting other calendar event options as needed.
- When you are finished, click Save.
Note: You can reschedule a Zoom meeting from your Google Calendar at any time. Simply edit the entry and make the necessary adjustments. If you are dragging and dropping the meeting to another calendar entry or copying the meeting information, do not make the changes.
Chrome extension scheduling options
If you use the Chrome extension, each time you plan a meeting, the Chrome extension will display the scheduling options, or you can schedule the meeting automatically using the settings from your last meeting that you planned with the Chrome extension.
- Schedule For: Depending on whether you have the permission to schedule for another user, you will be able to select them from the drop down list when you select the user to schedule for. To learn more about scheduling privileges, click here.
- Note: In order to schedule for another user, be sure to confirm all Zoom webinar window smaller, other options will move to [ Details ]. There are also new settings, as their default settings will not be applied by default.
- Meeting ID:
- Select from the following meeting ID types the one you would like to schedule the meeting with:
- Generate Automatically: The meeting ID will be generated automatically based upon a random number.
- Personal Meeting ID: This is your personal meeting identification number.
- Security: To ensure your meeting is as secure as possible, choose one of the following options:
-
- Passcode:
- Select a passcode for the meeting. In order to be able to join the meeting, participants will need to enter the passcode before they can join.
Note: In order for your admin to approve the passcode, the complexity needs to meet certain requirements. - Waiting Room: Allow the meeting to be held in the waiting room.
- Only authenticated users can join: The meeting can only be accessed by people who have signed in to the system.
- Encryption:
- When creating your meeting, you need to decide what kind of encryption you want to use:
- Enhanced encryption: using the cloud to store the encryption key
- in an end-to-end encrypted fashion. Your own device stores the encryption key locally.
- Note: Not all Zoom features are supported by end-to-end encryption. If you plan to schedule an end-to-end encrypted meeting, be sure to take into account those limitations.
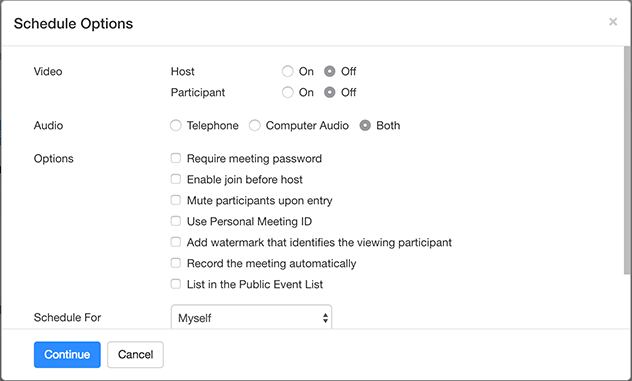
- Video
- Host: When joining the meeting, you can choose whether the host’s video should be turned on or off. Although you will not be able to see the host, they will still be able to start their video if you choose off.
- Participants:
- When you join the meeting, you will have the option to enable or disable the participants’ videos. The participants will be able to start their videos even if you choose to turn this off.
- Audio: It is possible to give users the choice of using telephone only (no computer audio), telephone and computer audio (both telephone and computer audio), or 3rd Party Audio (if your account enables this option).
- Options: Activate the following meeting features and options:
-
- Require registration: In order to receive the link to join the meeting, attendees will be required to complete a registration form. The web portal allows attendees to configure the registration questions as well as other settings.
- Allow participants to join anytime: The web portal allows attendees to join the meeting before or without you. In case you are a Basic (free) subscriber, the session will end after 40 minutes.
- Mute Participants Upon Entry: If the option Join before Host is not checked, all participants will be muted as soon as they join the meeting.
- Request permission to unmute participants: In order for the waiting room , the screen will change to the following screen. Please wait until the host to unmute participants at will, they will need to provide the host with their consent. In the event that the host declines the request, he/she still has the option of asking to be unmuted.
- Enable focus mode when meeting starts: Automatically introduce focus mode at the beginning of the meeting, in order to offer as few distractions as possible to all meeting participants. This feature is only available on client versions 5.9.0 and above.
- Add watermark that identifies the viewing participant: When content is shared during a meeting, add a watermark to identify who is watching. Click here for more information on adding a watermark.
- Automatically record meeting: Make sure that this option is checked if you wish to automatically record the meeting. Depending on how you want your session recorded, you can choose to record it locally (on your computer) or in the cloud (zoom.us/recording).
- Show in Public Event List: Select this event to appear in your Public Event List (if your account allows you to do so). You can find more information about the Public Event List here.
- Approve or deny entry to users from certain regions and countries: Depending on the preferences of the host, only participants from specific counties or regions can sign up or they can block all participants from special counties or regions.
- Include Invite Link in location field: It will also be included in the event description of the calendar schedule, as well as in the location field, where you can link to the meeting.
- Enable additional data center regions for this meeting
- Alternative Hosts: For a meeting to proceed without your presence, you will need to provide the email address of another Zoom user who is registered on your account.
- Note: Adding alternative hosts to a meeting can be done by enabling the setting to Allow alternative hosts to add polls, or enabling the option to Allow alternate hosts to edit polls. A Zoom client version greater than 5.8.0 is required to access this feature. We encourage you to learn about roles in a meeting if you are not sure that the alternative host role is the right one for you.
How to display scheduling options each time
Whenever you schedule a meeting with the option that was used for the last meeting, the meeting will be scheduled using those options by default. It is however possible to make these options appear every time the meeting is scheduled.
Note: In order for the scheduling options to appear on the full calendar event scheduling page, you will need to click on Make it a Zoom Meeting in order for it to be considered a Zoom Meeting. Clicking on the “schedule” button in the small window will take you to Zoom’s default meeting settings if that is what you want.
- In the address bar of your browser, click on the icon of the extension.
- You will be taken to the Zoom webinar window smaller, other options will move to [ Details ]. There are also new Settings page.
- To enable the schedule drop-down box to allow you to specify options for every schedule, you need to select it.
Whenever you are scheduling a meeting with the Scheduler extension, you will now be able to see the scheduling options.
How to fix the Session Has Expired message
This problem can be fixed by logging into the Zoom Chrome Extension again if you receive the message “Your Zoom Chrome Extension session has expired.”.
- In the address bar of your web browser, click on the Zoom extension icon.
- Once you have signed in, you will see the Zoom extension icon.
- You have three options for logging in: Sign In with Google, Sign In with your E-mail and Password, or use SSO and sign in with Google.
Frequently Asked Questions
How do I schedule a Zoom meeting on the app?
- To access the Zoom app on your mobile device, you must sign in.
- Schedule can be accessed by tapping the Schedule button.
- Select the options you would like to use for the meeting. If you have disabled the settings that are applied to your account or group, the options may not be available to you if you have deactivated your account, locked it to off, or disabled them at the account level. Enter the topic in the Topic field or enter the name of the meeting in the Meeting Name field.
- Finish scheduling by tapping Done at the bottom of the screen.
How do I open the Zoom app in Chrome?
- Click on the Chrome icon.
- Click on the link join.zoom.us and follow the instructions.
- If you have received your meeting ID from the organization or the host, please enter it here.
- Then click the Join button.
- Please click on Zoom Meetings (PC) (PC) or Zoom.us (Mac) if you are viewing this on a PC. Every time you want to launch Zoom from a web browser, you need to make sure that you click this option.